
Auto Glass and Windshield Repair: Professional Tips
Links to Amazon and other retailers on this page can be affiliate links or other sponsored advertising.
When you click and/or make a purchase, JADCOM Media LLC may earn a small commission. Thank you.
That sudden thwack against your windshield is a sound every driver dreads. One moment you’re enjoying the drive, the next, you’re left staring at a new star-shaped rock chip or a creeping crack. This common experience leaves many car owners facing a dilemma: is this a quick fix or a major expense?
The good news is that for many minor chips and small cracks, a DIY auto glass repair is not only possible but can be a highly effective and satisfying solution. Addressing windshield damage promptly is crucial for maintaining the structural integrity of the glass and, most importantly, the safety of the vehicle. A flaw in the driver’s line of sight is a significant safety hazard, and what starts as a small chip can quickly spread into a cracked windshield requiring a full windshield replacement.
This guide will provide professional tips to help you determine if a DIY approach is right for your situation and walk you through the process to prevent a subpar repair and ensure a successful, outcome.
Can You Really Repair It Yourself? Assessing the Damage
The first and most critical step is to evaluate the type of damage. Not all damage is created equal. Understanding the difference between minor damages and situations where there is a risk of further damage, will save you time, money, and frustration.
Ideal Candidates for a DIY Fix
- Bullseyes: Circular breaks with a dark impact point.
- Stars or Star Breaks: Short cracks radiating from the impact point.
- Combination Breaks: A mix of a bullseye and short cracks.
- Small Cracks: Any crack shorter than the size of a dollar bill (about 6 inches). The most success is found with cracks under 3 inches.
The golden rule for a DIY route is that the damage should be well away from the edge of the glass and completely outside the driver’s line and field of vision. Even a professionally repaired area can have minor optical distortions, so it should never be in the critical driver’s view.
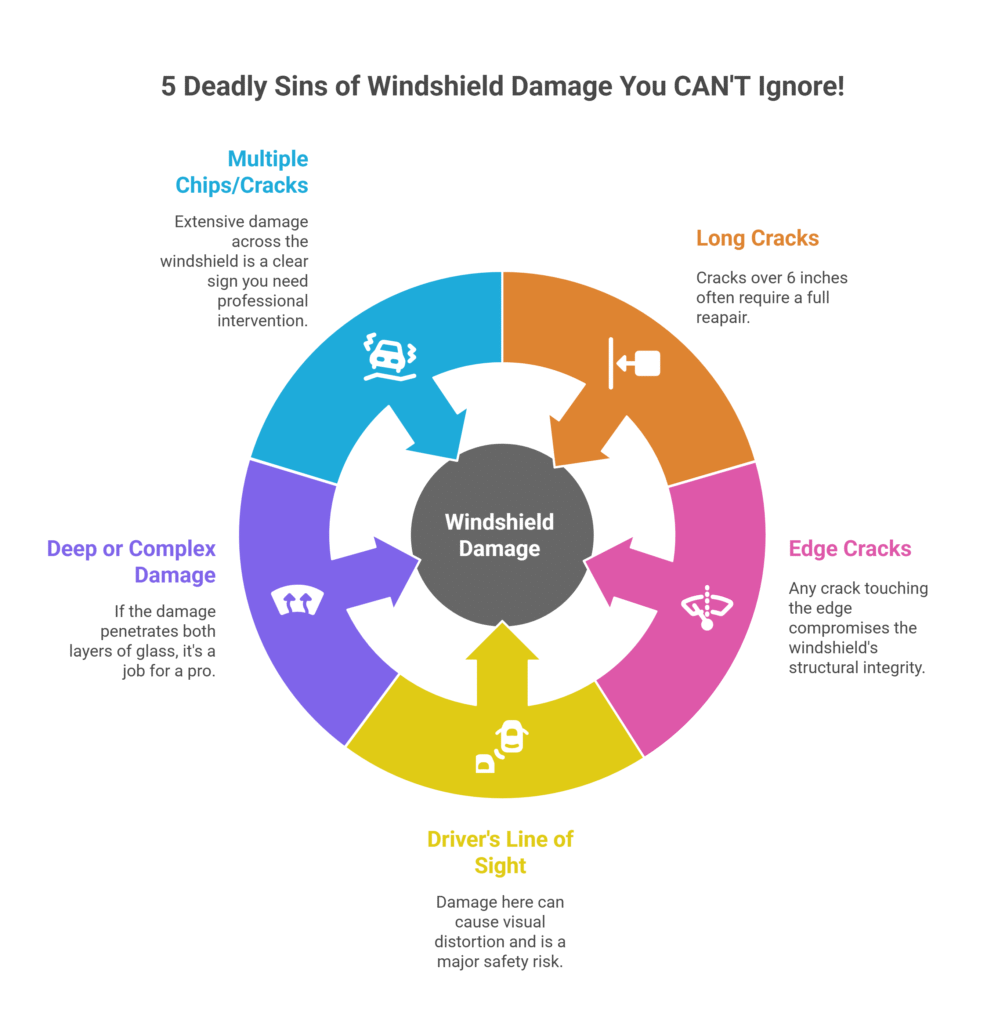
When to Immediately Seek Professional Help
- Long Cracks: Cracks longer than 6 inches often require advanced tools and techniques.
- Edge Cracks: Any crack that touches the edge of the windshield compromises its structural integrity and usually necessitates a windshield replacement.
- Damage in the Driver’s Line of Sight: As mentioned, this is a job for professional windshield repair services to ensure no distortion remains.
- Deep or Complex Damage: If the damage has penetrated both layers of glass, a DIY fix could risk further damage.
- Multiple Chips/Cracks: Extensive damage across the entire windshield is a clear sign you need professional intervention.
If your damage falls into the “DIY” category, you’re ready to proceed. A successful repair hinges on three things: the right tools, a steady hand, and a bit of patience.
Gathering Your Arsenal: The Right Tools for the Job
While true professional repairs use commercial-grade equipment, high-quality DIY windshield repair kits available at most auto parts stores are remarkably effective. These kits are designed for a first time user and contain the essential tools you’ll need.
A proper windshield repair kit will include:
- A high-quality resin solution.
- A bridge or pedestal device with suction cups to hold it firmly to the glass.
- An adhesive disc to create a seal.
- A syringe plunger to inject the resin.
- A UV light or UV lamp and a curing strip.
- A razor blade for cleanup.
Before you begin, ensure you have glass cleaner and a microfiber cloth on hand to achieve a perfectly clean surface.

The DIY Windshield Repair Process: A Step-by-Step Guide
Step 1: Prepare the Work Area
Start by parking your car in a garage or shaded area, away from direct sunlight and extreme temperatures. Both heat and cold can interfere with the repair process and the curing of the resin solution. Clean the affected area thoroughly with glass cleaner and ensure the surface is completely dry.
Step 2: Set Up the Repair Bridge
Following the instructions in your kit, attach the bridge apparatus to the windshield using the suction cups. Center it directly over the damaged area. This device will hold the injector perfectly in place.
Step 3: Inject the Resin
This is the most crucial part. Using the syringe plunger, you will slowly inject the repair resin into the chip. The goal is to fill the entire break and force out any trapped air. Apply steady, gentle pressure and watch as the resin wicks into the finest cracks. This step replaces the loose shards of glass caused likely by a rock hit, with clear, strong resin. Be patient; rushing can lead to air bubbles.
Step 4: Cure the Resin
Once the excess resin is visible on the surface and the break is fully saturated, it’s time to cure it. Place the curing strip over the pit and use the UV lamp or curing light as directed. The UV light will harden the resin solution in minutes, bonding it permanently to the glass.
Step 5: Clean and Polish
After curing, carefully remove the bridge. You’ll be left with a small amount of hardened excess resin on the surface. Use the razor blade held at a 45-degree angle to gently scrape it away. Finish by polishing the repaired area with a clean cloth. The result should be a smooth, clear surface that significantly reduces the visibility of the damage and restores the windshield’s integrity.
Limits of DIY and the Value of a Professional
Even with the best DIY kits, there are inherent limits. Complex damage, large cracks, and issues involving the line of sight are not suitable for a DIY approach. Professional services have access to advanced tools, more powerful high-quality resin, and the experience to handle complex repairs that guarantee clarity and strength.
Many insurance policies cover windshield repair and even windshield replacement with zero deductible, making professional help a cost-effective option. The peace of mind that comes with a guaranteed repair and the assurance of your safety on the road is often worth the investment.

Empowerment Through Clear Knowledge
Tackling a windshield chip repair yourself can be an empowering experience. For stone chips and minor windshield cracks, a DIY auto glass repair kit is a powerful tool that can save you money and extend the lifespan of your windshield. By accurately assessing the damage, using the right tools, and following the process carefully, you can achieve excellent results.
However, knowing when to call in the experts is just as important. For the safety of the vehicle and everyone inside, never compromise on repairs affecting the driver’s visibility or the fundamental structural integrity of the glass.
Conduct regular inspections of your windshield and address any new cracks or chips immediately. Whether you choose the DIY route or opt for professional repairs, prompt action is the key to maintaining your visibility, your safety, and your peace of mind on every journey.


